Keeping you up to tech in teaching and learning. This blog is created by EdTech staff in Technology Services. EdTech & Media Services are a part of Technology Services.
Puget Sound recently launched Canva for Campus. Faculty & staff can learn more at pugetsound.edu/canva-campus and sign up here for this opportunity. Students are provisioned with free accounts, which can be accessed via login.pugetsound.edu. Refer to the links below to learn more about Canva’s online video editor.
Your Canvas course layouts should be simple, clean, and uncluttered. The course navigation should be clear and consistent. Headings should allow for quick scanning and always be descriptive.
Use these features for accessible formatting
Alt Text is read by screen readers. It describes embedded images and displays when the image cannot display. Descriptive hyperlinks give students context to links, provide clarity on link destination, and should always be underlined Headings help all students navigate course materials, assist when using screen readers, and provide structure for content. Tables should display data & information, and should not be used to create layouts. Text emphasis helps text stand out for visually impaired students. Use bold, italic or underlined text. Never use color for emphasis.
With final exams approaching here’s a reminder about how to set up accommodations in Canvas. If you are conducting an exam on Canvas, and you have students with accommodations needing extra exam times, please make sure that the “assign to” section does not say “Everyone.” You should have different “available from” and “available until” times for students with accommodations. Here’s more about setting different start times for specific students: https://community.canvaslms.com/t5/Instructor-Guide/How-do-I-make-a-quiz-available-before-or-after-the-due-date/ta-p/1241
If your exam is a timed exam, there is a second part to setting up accommodations. You must use “moderate this quiz” to give extra time to your SAA students.
Your Educational Technologists are happy to meet with you in advance to help you set up your quiz or to look over the settings. Email us atedtech@pugetsound.edu
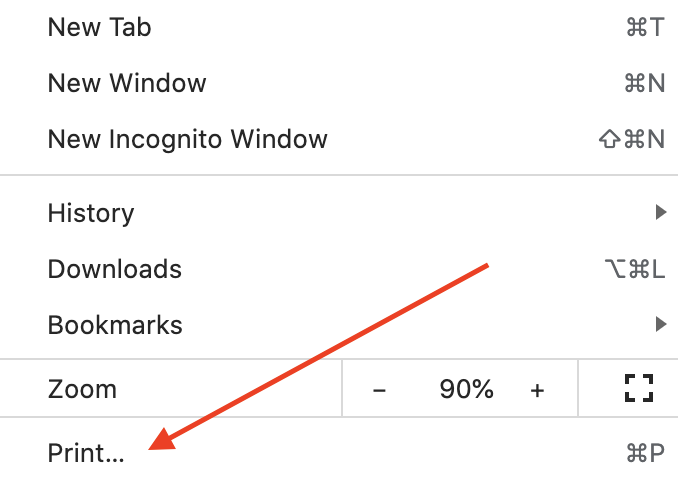
There may be times when you would like to print a copy of a Canvas Quiz. To do so, navigate to Quizzes, and click the name of the Quiz. Then, click the “Preview” button.
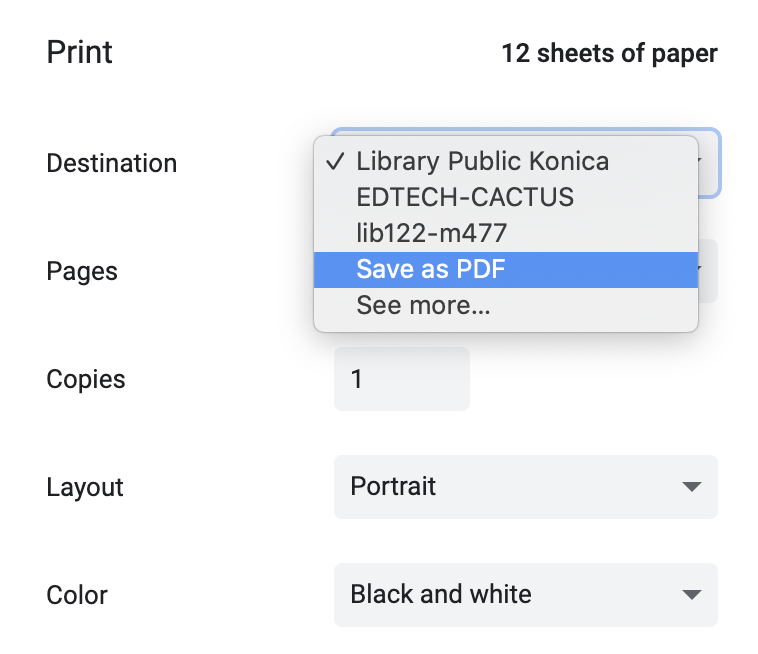
From your web browser, select “Print” or click “Command” plus “P.” Here’s an example from Chrome:
Then, you can either select a printer, or save the document as a PDF.
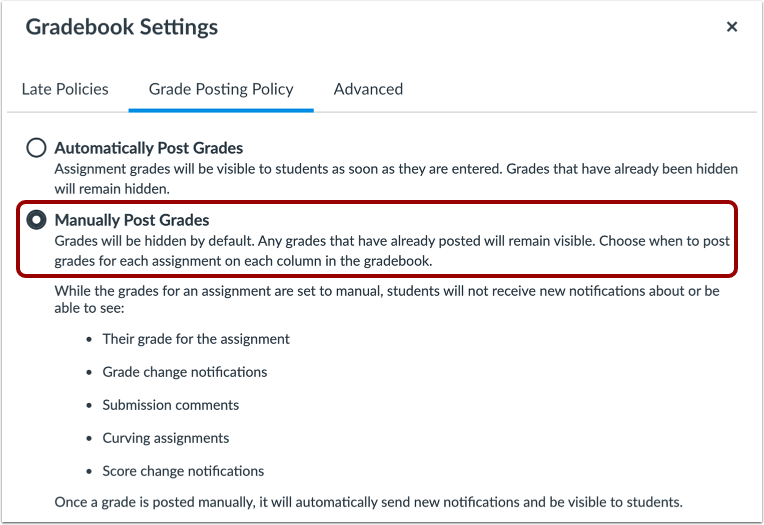
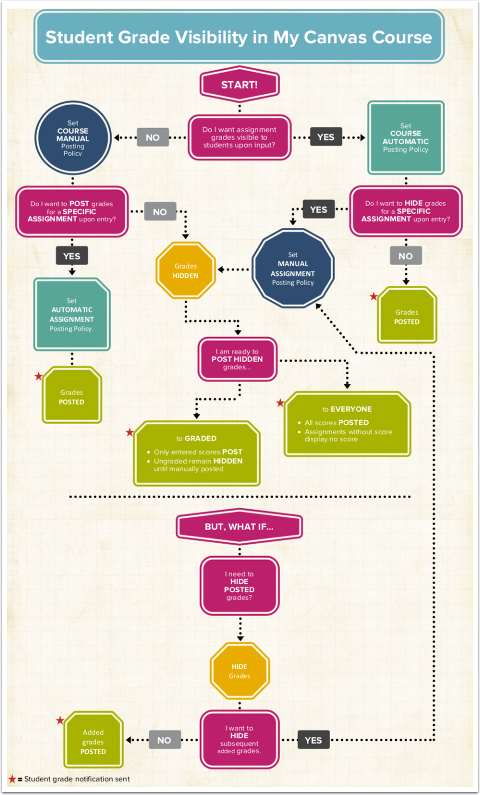
If you use the Canvas Gradebook here’s how you can change your grade posting policy from “automatic” to “manual.”
By default, Canvas sets an “automatic” grade posting policy for all courses. This means grades are automatically visible to students when they are entered. When the posting policy is changed to “manual,” grades are hidden and must be manually posted to students using the “Post grades” option in the Gradebook before they can be viewed. Hidden grades are visible to instructors, but students cannot see them.
Posting policies can be set for an entire course or for individual assignments. Assignment-level posting policies will override the course-level posting policy for that assignment. Posted grades can also be hidden using the Hide grades option. The Hide grades option only hides grades that are currently visible to students. In order to ensure all future assignment grades are hidden, you will need to use a manual posting policy for the assignment or course.
If you want to change your grade posting policy please reach out to Educational Technology or follow the steps below:
Canvas has a feature called Immersive Reader that can enhance users’ reading experience by improving accessibility and boosting reading comprehension. Immersive Reader lets users change font size, adjust text spacing and background color, and read text aloud.
Once enabled, the course Home Page, Assignments, Pages, and Syllabus will display an Immersive Reader button in the upper right. The button is not visible in Quizzes or with attachments such as PDFs.
Immersive Reader is a user-controlled setting. If you enable it for yourself it does not become enabled for the students in your class.
To enable Immersive Reader reach out to Educational Technology or follow the steps below.
Click Account on the upper left, then Settings from the menu. Note: this area of Settings is not the same as Course Settings.
Scroll down to Feature Options and enable Microsoft Immersive Reader.
More information about Immersive Reader can be found here:
After receiving faculty requests, and following discussion with the LMIS (Library, Media, Information Services) committee, a change has been made to the end date for Canvas courses. Students will now be able to access Canvas courses 28 days past the end of the semester, instead of 14 days.
This change will resolve a problem that had occurred between semesters where some students were not able to view feedback on their assignments. For example, student access for Fall 2022 courses ended on December 29 yet grades were due on January 2.
If you want courses to end earlier please reach out to Educational Technology or follow the steps below:
Click Settings in the course
Remain on the “Course Details” tab, and scroll down to the “Ends” section
Enter the date you would like the course to end for students
Scroll down and click “Update Course Details” to save your changes
A default setting in Canvas is the student visibility of Grade Distribution Graphs. The distribution graphs show the mean score, the high score, and the low score. Personally identifiable information is never provided to students. However, this type of data may not be useful information for all courses, especially in small classes.
Canvas sets the default global setting for grade distribution for all courses to be Enabled/ON. We cannot turn off the feature at the campus level, but it can be turned off at the course level by an instructor.
When the grade distribution graph is hidden, students can view their scores, but cannot view the mean, high, or low scores.
To hide the graphs contact Educational Technology or follow the steps below:
Click Settings in the course
Remain on the “Course Details” tab, scroll down, and click the “more options” link towards the bottom of the settings page.
Under “more options,” click the box next to “Hide grade distribution graphs from students.”
Scroll down and click “Update Course Details” to save your changes so the graphs will no longer be visible to students.
Scheduling Zoom through Canvas places Zoom links on your students’ Canvas calendars. However, if you import course content from a previous class, make sure you don’t bring in old Zoom links. When importing, choose the “Select specific content” option and then choose everything except for calendar events. Be sure to reach out to your Ed Tech if you encounter any issues.
Don’t forget to update your Zoom application, restart your computer, and close any unnecessary applications or documents before hosting or joining a Zoom meeting.
You can find Zoom in the left navigation pane of Canvas, near the bottom of the list.
From there, you can schedule your Zoom meetings for your class within Canvas. You can set times, recurrences, and security options like passcode and waiting room.
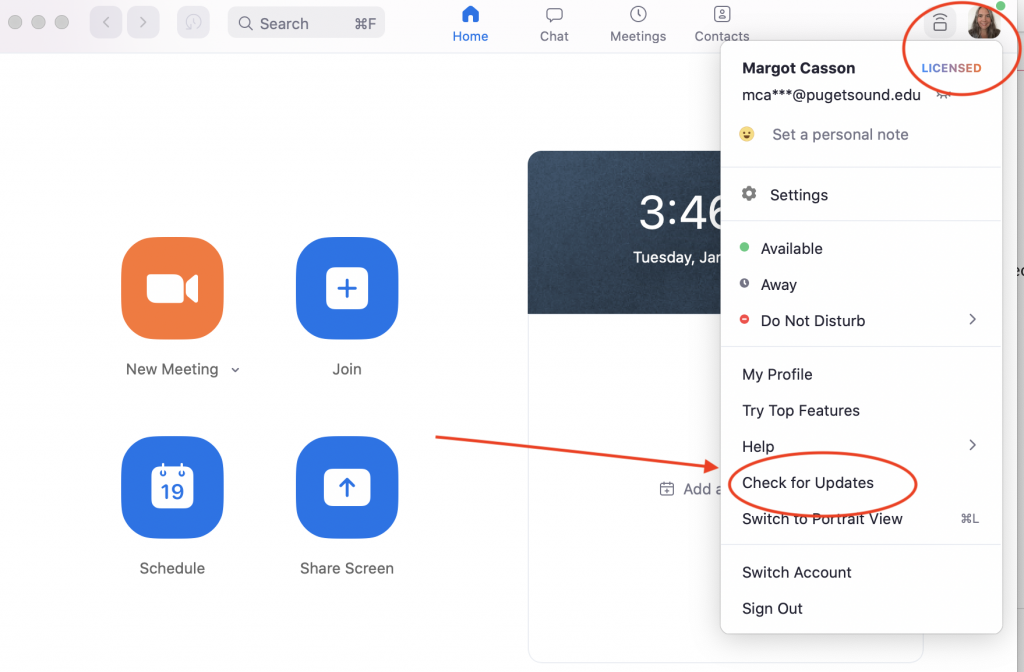
Not sure if your Zoom application is updated? Open up Zoom, click on your icon, then select “Check for updates.” If you can’t find Zoom on your computer, go to login.pugetsound.edu and look for it under “My Apps.”
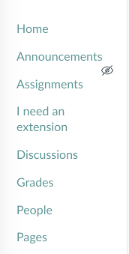
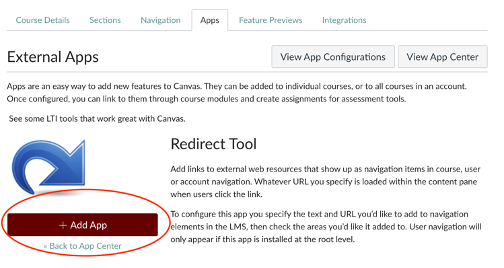
Have you ever wanted to customize the links on the left side of your Canvas page? The Redirect App allows you to add links to external web resources and include those links in the navigation pane in your Canvas course. After installing the Redirect App you will control the name of the new link and specify where users go when they click on the link.
For example, you could create a Google form called “I need an extension” and create a direct link to the form.
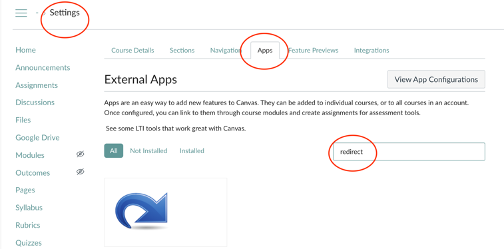
To add the Redirect App go to Settings, then Apps.
Search for Redirect, then add the App.
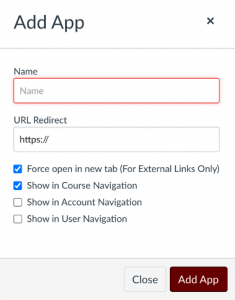
Once you have added it enter what you want to link to be called followed by the url where you would like the link to point to.
Then, go to Navigation and drag the new link where you want it to go. Be sure to click Save and check the link to make sure it is redirecting correctly. Reach out to your Ed Tech if you need more help.